This is the WEEK!... We are finally able to paint!!!!. OMG after 4 years the glider is white again!
Photos to follow!
I will update this post at the end of the week, I took this week off from work to get this plane done.
As it goes, we just finished painting the wings. They are awesome! All that is left to paint is the fuselage, canopy, ailerons, and rudder!.
Mid-week update
I was told that the blue markings that were originally planned, cannot be used due to the fact that they are a violation of the Type Certification of the glider. There was even a question on whether or not I could use the blue on the registration and competition letters.
Sunday, April 13, 2014
Sunday, March 23, 2014
4 years now .... and nearing the home stretch!
Update on the project - Mid-March
We are now just a little over the 4 year mark on when I first found this Libelle on the SSA Classified Ads. So, where are we?
I created a punch list of things left to do:
Wings
Mount winglet spring pins.
Repaint interior frame.
Horizontal Stabilizer
Primed and painted
Rudder
W/B - painted.
We are now just a little over the 4 year mark on when I first found this Libelle on the SSA Classified Ads. So, where are we?
I created a punch list of things left to do:
Wings
Mount winglet spring pins.
Fuselage
Forward wing alignment bar primed, painted gray.
Cockpit back and inside under ledge – painted gray.
Safety wire on bolts in gear well – release turnbuckle – Aileron cantilevers.
CanopyForward wing alignment bar primed, painted gray.
Cockpit back and inside under ledge – painted gray.
Safety wire on bolts in gear well – release turnbuckle – Aileron cantilevers.
Repaint interior frame.
Horizontal Stabilizer
Rudder
W/B - painted.
Ailerons
W/B - and painted.
W/B - and painted.
All we need now is a couple of weeks of good steady warm weather to paint the plane!
I'm still optimistic that we will be done by the end of April!
Monday, March 10, 2014
Getting Closer!!


All there is left to cleanup and prime are the ailerons.

They will be mounted to the winglets after we get the glider assembled and we can see how they will need to be positioned to prevent the ailerons from dragging the runway during the take off roll.
The shop at the airport is geting busy, and Joseph will need to break from the Libelle project over the next 3 weeks. But that will also be about the time the weather will hopefully warm up enough to allow us to apply the paint!
Sunday, March 2, 2014
March 1st 2014 - Getting close to the 4 year mark

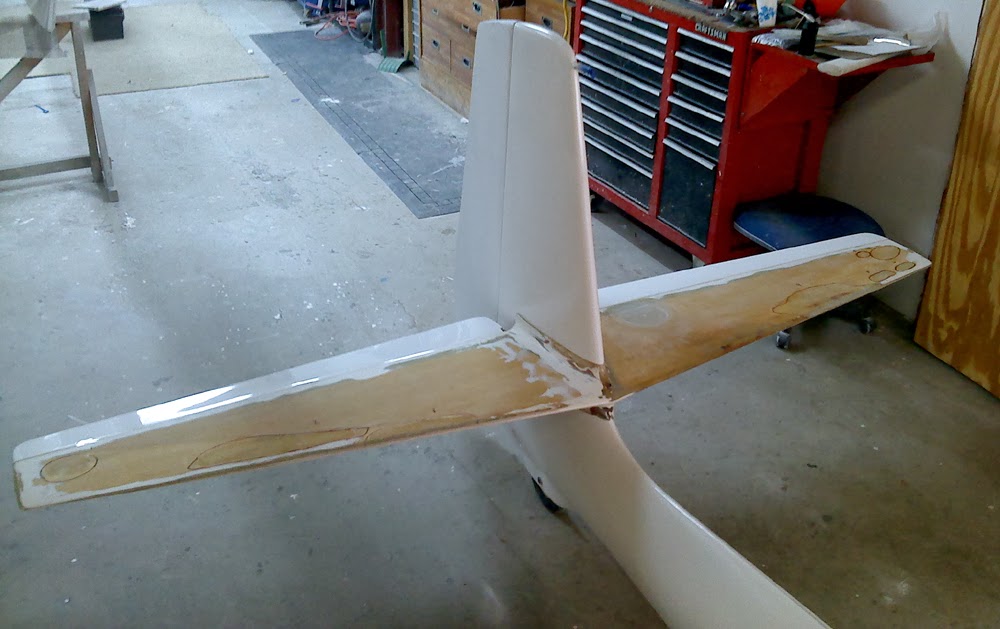
This is another first.. I haven't seen this tail like this for 4 years!
So, just the tail and the canopy is all that is left before we can paint!.... Now all we need is some warm weather!
Sunday, February 16, 2014
The winter work continues
Over the month of January, and the first weeks of February, the temps were too cold in the hanger to do much work, so Joseph focused on some of the small stuff.
As he attempted to do some work, he ran into difficulties with the primer and paint due to the cold. but was able to get the rudder primed and the elevators primed and painted.
When he was working on getting the seat back painted, the cold slowed the curing processes even with lights on to keep the part warm. I ended up doing the work at home.
 The new head rest was attached
 .... and the seat was resealed and painted.
 Mid-February has been unusually warm here in New Mexico. The warm spell gave Joseph the opportunity to start priming the wings.
Joesph's attention to detail and being extra critical of his work has provide excellent results.
The right wing has just a primer coat on it, but it is virtually flawless.
 .... there is no apparent wave in the reflection of the wing.
We will see how it all turns out after the wings are painted and polished out!
The left wing will be primed this week, and then the finally work on the horizontal stabilizer.
We are shooting for a completion in April!
As he attempted to do some work, he ran into difficulties with the primer and paint due to the cold. but was able to get the rudder primed and the elevators primed and painted.
Joesph's attention to detail and being extra critical of his work has provide excellent results.
The right wing has just a primer coat on it, but it is virtually flawless.
We will see how it all turns out after the wings are painted and polished out!
The left wing will be primed this week, and then the finally work on the horizontal stabilizer.
We are shooting for a completion in April!
Sunday, January 12, 2014
Winter 2014, The New Year - Lets start the year horizontal! "Part I"
It's also three months away to the close of the forth year on this project!
Where has the time gone!!!!
With the project funds exhausted again (which I thought would be enough to wrap this project up, once and for all), we find Joseph and myself are back to doing work in my garage. Any large tasks are now being planned as a set of small assaults on the glider while we still have it at the airport.
The "Things to Do" punch list is getting smaller, but we have many details to address, but only if we can get the glider assembled for at least three days (of which, two days will need to be on a weekend).
 For now, the first weekend of the new year was devoted to the re-repair of the repair to the damage on the left lower
skin on the horizontal stabilizer. For those who don't remember the barn door repair, please refer to this photo. The main reason for redoing the repair was due to the stabilizers balance was way off due to the repaired side being too heavy!
For now, the first weekend of the new year was devoted to the re-repair of the repair to the damage on the left lower
skin on the horizontal stabilizer. For those who don't remember the barn door repair, please refer to this photo. The main reason for redoing the repair was due to the stabilizers balance was way off due to the repaired side being too heavy!
A couple of years ago I wrote to Streifeneder about acquiring a replacement skin, and tail fairings, but was told that those molds no longer exist.
Without a source of replacement materials, I would need to improvise.
 Since the upper and lower halves of the horizontal stabilizer are symmetrical. I made a mold off of the upper right skin. Of course, this was done over two years ago.
The mold was waxed, and with the drawings provided by Streifeneder, we were able to replicate the skin with the correct fiberglass lay-up schedule.
 This photo shows the initial lay-up with the balsa prior to the final inner ply.
 After the first 24 hours of curing, the skin popped out cleanly for inspection. The skin will have a 15 hour post cure before being installed.
 During all of the skin lay-up and cure time, Joseph and I focused on the other side of the repair. on the upper side, there was an area of damaged that was about 5" in diameter. The repair was glassed over, but there was a depression that was full of bondo.
 After the cleanup of the damage repair, we decided that we could do a better job and without the deep depression.
 So, I opened the area to be repaired, and found that the barn door repair was made using blue foam ribs, cemented in place. There was also a load of debris that was never cleaned out during the first repair.
No wonder there was so much rattling inside!

 A patch was made following the instructions per the drawing and was epoxied in. The top layers of glass were applied according to the fiberglass lay-up schedule
Now we are in the second week of January and its time to replace the old repair with our NEW stabilizer skin.
Due to the way the old repair was made, the old skin had to be cut into sections to allow access to the foam ribs that were inserted.
 The old repair was made of balsa, with layers of bondo to build up the shape from the underside, with layers of glass on the bottom and top of the skin.

Compared to the new skin.
 There is NO comparison! The replacement looks great!
This re-repair was incredible. The old repair weighs in at 597 grams (with some material mising during the removal), and the new replacement skin weighs in at 308 grams prior to being glued in.


Here the new skin is being test fitted prior the trimming of the edges for the final fit and cementing to the stabilizer.
Robert dropped by to inspect what the wizards were doing and made a few suggestions. So, we packed up the traveling glider project, and back to the airport we went. This way, Robert will be able to keep track and instruct Joseph before we were to get too far, and then redo it halfway through.
Part II to follow!
Where has the time gone!!!!
The "Things to Do" punch list is getting smaller, but we have many details to address, but only if we can get the glider assembled for at least three days (of which, two days will need to be on a weekend).
For now, the first weekend of the new year was devoted to the re-repair of the repair to the damage on the left lower
skin on the horizontal stabilizer. For those who don't remember the barn door repair, please refer to this photo. The main reason for redoing the repair was due to the stabilizers balance was way off due to the repaired side being too heavy! A couple of years ago I wrote to Streifeneder about acquiring a replacement skin, and tail fairings, but was told that those molds no longer exist.
Without a source of replacement materials, I would need to improvise.
Since the upper and lower halves of the horizontal stabilizer are symmetrical. I made a mold off of the upper right skin. Of course, this was done over two years ago. The mold was waxed, and with the drawings provided by Streifeneder, we were able to replicate the skin with the correct fiberglass lay-up schedule.
This photo shows the initial lay-up with the balsa prior to the final inner ply. After the first 24 hours of curing, the skin popped out cleanly for inspection. The skin will have a 15 hour post cure before being installed.No wonder there was so much rattling inside!
Now we are in the second week of January and its time to replace the old repair with our NEW stabilizer skin.
Due to the way the old repair was made, the old skin had to be cut into sections to allow access to the foam ribs that were inserted.
Compared to the new skin.
This re-repair was incredible. The old repair weighs in at 597 grams (with some material mising during the removal), and the new replacement skin weighs in at 308 grams prior to being glued in.
Joseph had to carefully grind out the old 2-part epoxy used to glue in the old repair.
 The lip to support the new skin was created by grinding out the remaining material from the old repair.
Here the new skin is being test fitted prior the trimming of the edges for the final fit and cementing to the stabilizer.
Robert dropped by to inspect what the wizards were doing and made a few suggestions. So, we packed up the traveling glider project, and back to the airport we went. This way, Robert will be able to keep track and instruct Joseph before we were to get too far, and then redo it halfway through.
Part II to follow!
Sunday, December 29, 2013
Week 4 and we are dancing the same dance, .... again!
Well, it's week 4, the end of 2013, and we are dancing the same dance again! You Remember... one step forward, two, to three steps back!

Joseph has been working feverishly to get the glider ready to paint prior to the week of Christmas, so when I'm off that week, we can finish prepping the glider for paint.
At the end of week 3, Joseph found himself over the barrel on an extreme learning curve. After spending the entire week of smoothing down the top of the right wing, he thought he was done and ready to work on the left wing, but was told that he was close on getting the airfoil correct. There were some additional tools he needed to verify his work.
So, with the tools in hand, and on the day that I arrived to spend the week working on prepping the glider, we spent two days correcting some minor waviness on the top of the right wing.
By Monday, we were able to start on the left wing, which took the two of us three days to correct same waviness issues.
 Joseph worked on the canopy for a few hours to get a break from the work on the wing.. which was making him crazy!

So, where are we? ...
well....... during the entire week, the temperature outside was too cold, and prevented any serious painting.
Only the application of Feather Fill and primer could be done.
After Sunday December 29th... The right wing is about ready for primer,
 the rudder is also just about ready for primer, and one elevator was primed.
 During the week, questions were brought up, and resolved, like how to seal the wing? The question of sealing the break boxes was brought up , and resolved with adding a seal to the lower airbrake pushrods at the airbox junction on both wings. The additional seals will be added after the wings are finished.
That all being said, after a few set-backs, we are now over budget again, with about another 100 or so hours to complete the bird. With winter setting in over New Mexico, the temps will, for the most part be too cold to paint until spring (March'ish).
Joseph and I will continue to work on the odds and ends as I will need to be able to afford a few hours of work here and there.
We are shooting for April as the completion date. Fours years on this project! OUCH!
Joseph has been working feverishly to get the glider ready to paint prior to the week of Christmas, so when I'm off that week, we can finish prepping the glider for paint.
At the end of week 3, Joseph found himself over the barrel on an extreme learning curve. After spending the entire week of smoothing down the top of the right wing, he thought he was done and ready to work on the left wing, but was told that he was close on getting the airfoil correct. There were some additional tools he needed to verify his work.
So, with the tools in hand, and on the day that I arrived to spend the week working on prepping the glider, we spent two days correcting some minor waviness on the top of the right wing.
By Monday, we were able to start on the left wing, which took the two of us three days to correct same waviness issues.
So, where are we? ...
well....... during the entire week, the temperature outside was too cold, and prevented any serious painting.
Only the application of Feather Fill and primer could be done.
After Sunday December 29th... The right wing is about ready for primer,
That all being said, after a few set-backs, we are now over budget again, with about another 100 or so hours to complete the bird. With winter setting in over New Mexico, the temps will, for the most part be too cold to paint until spring (March'ish).
Joseph and I will continue to work on the odds and ends as I will need to be able to afford a few hours of work here and there.
We are shooting for April as the completion date. Fours years on this project! OUCH!
Subscribe to:
Comments (Atom)