The 1st of March was the first weekend it was warm enough for me to start on the wings.
The first thing I needed to do that has been bothering me since I first bought the plane, was to get the water bags out of the wings. I'm was also curious to know what was rattling around in the right wing?
During my pre-buy inspection, the right wing dropped when we were assembling the glider, and the tip hit the floor of the hanger. I heard something loose, and a rattlling sound inside that wing.
Before starting on the the sanding of the wings, I removed the old mylar aileron seals with 3M adhesive remover on the tops and bottoms of the wings. I also removed the fabric covers on the aileron pushrods sticking out of the wingroot. Before I had a chance to work on the right wing, I needed to remove some parts to send to Streifeneder for overhaul. The first parts I removed were the aileron drives. These parts consist of a ball-joint actuator and a series of bearing disks mounted in two plates.

There is a fiberglass plate, which is secured by steel screws on the underside of the wing that must be removed. This exposes a slot opening that allows the aileron to slide toward the wing root while in the downward deflected position.

The screws were filled with Bondo, that had to be popped out, Then the screw heads had to be cleaned out in order for them to be removed. The fiberglass plate just popped off when the screws were removed.


Step two was to clean out the Bondo filler covering the bearing plates holding the aileron drives in place.

To get to the hex screws mounting the bearing plates to the drive cage, layers of bondo were carefully chiseled away.


The hex screw heads were cleaned out by using a fine drill bit, and a metric Allen wrench made quick work for removing the screws. (There are two on each side)


Next, the bolt holding the push rod to the aileron drive was removed.
I had to carefully pry the bearing cover to free it from the drive.

These parts were in horrid condition and looked like they had blue cheese mold growing on them!
If you have never inspected these drives in a long while, or never, I would recommend having them checked out by your AP-IA. You might be surprised by their condition!
If you have never inspected these drives in a long while, or never, I would recommend having them checked out by your AP-IA. You might be surprised by their condition!

The drive and aileron will now slide out and off of the wing.
I had to use a grease cutter to loosen the pin holding the drive to the aileron.

The push rod was inspected for corrosion, and the gelcoat was removed around the inspection port and aileron drive mounting plate.

The aileron drives, and their parts were cleaned, and the old paint was removed prior to sending them to Germany to be overhauled.

Now, you're gonna love this!
My next task was to remove the water bags from the wings.
It was a challenge! I had to twist the stem on the bags, left, then right to free them. It felt like they were glued in!.
As I continued to twist the stem, I was able to free the widest part out through the opening. As more of the bag became exposed, I was shocked to see what they were made of! Then with a continuous pull, the bag came out!.

 Now that the water bags were remove, (and probably seeing daylight for the first time in 20-plus years), upon further examination, they seem to have been constructed from orange polypropylene bags, glued together and reinforced with duct tape. This reminds me of the raft and life vests made for the daring escape from Alcatraz by Frank Morris and colleagues.
While removing the water bags from the wing, I noticed that the bearings for the aileron push rods for the fuselage linkage were also corroded. I wanted to include these with the parts I was sending to Streifeneder


On the threaded portion of the bearing assembly, the corrosion was so bad, that it required penetrating oil to break the threads free.
The bearing assembly on the right wing loosened up and unscrewing it from the aileron push rod was easy.
Now the left wing was a different story.
Now the left wing was a different story.
The bearing assembly on this wing was also corroded, and I was unable break it free from the push rod. I soaked the threads in penetrating oil for hours before the assembly would start to loosen up.
Here is where I screwed up! .... As I was unscrewing the assembly, the screw threads got stuck in the thread on the push rod, and while putting too much torque on the assembly, my hand holding the push rod slipped, and I felt the push rod twist and I heard a pop!
I took a flashlight and examined inside the wing, and noticed that the rod had a tear and it was near the bearing attached to the first cantilever near the airbrake box.
I twisted the rod slightly back and forth, and the rod popped right out of the wing!
Dammit! I broke a push rod in the left wing!
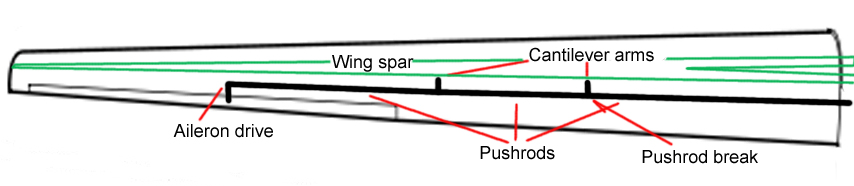
(Note - there are three push rods in the wing and attached to two cantilever arms before attaching to the aileron drive.)
 When I remove the rod, I noticed a lot of loose material falling out of the rod.
And when I inspected the break, it looked like there was corrosion at the break.
I was feeling really bad about what just happened. I called Robert to discuss what we needed to do to fix the break.
Robert didn't want me to do anything with the wing until he had a chance to look at it. I also wrote to Streifeneder to ask them what they needed from me to replace the damaged push rod.

Here is a photo of the cantilever with the remaining part of the push rod still attached (red arrow). The piece is the bearing. The Push rod is over 135cm in length with a bearing welded to one end.
The next weekend, we loaded up the wing and drove to Roberts shop.
When we arrived, Robert stated, (with a big smile on his face), "OK lets see what you screwed up!".

He looked at the push rod closely and noticed some rust on the inside edge where it broke. We pulled out the wing and set it upon two padded saw horses. Robert looked in to see where the first cantilever sat in relationship with the bottom airbrake box.


Since the sun was at his back, Robert could not see where the cantilever sat, so he covered his head, looking not unlike a view camera photographer,.... "say cheeeese!"
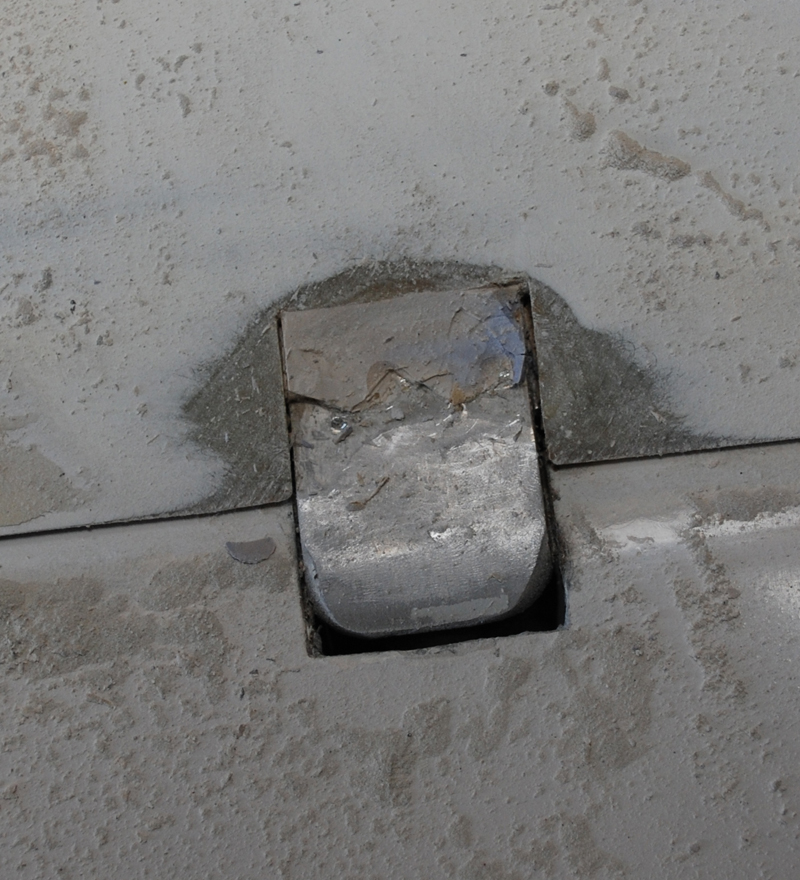
With a new bearing on where things were situated, Robert marked the wing in pencil, and drilled a hole with a fine drill bit. When the hole was through the skin, he placed the bit into the hole to see how close he was to the location of the cantilever.


After three tries, he was ready to bore through the skin with a one and a half inch cutting head.


The cut was clean .... and perfect!


So perfect, that Robert "William Tell" Mudd, hit the bolt near the nut ... Just take a close look at this photo! The red arrow points to the hint of silver on the end of the bolt, were the cutting bit tapped it!

How came the moment of truth, lossen the nut, pop out the bolt, and fish out the bits and pieces!

Here it the end of the push rod that was broken off.

And here is the close-up of the rust!
The drama is done! All of the parts have been shipped to Germany. and for now, I'm all that's left to tell the tale.
Fin
I think I'll start sanding this wing first.
John,
ReplyDeleteIf your Libelle truns out an good as the blog you are doing, it will be the nicest Libelle in the fleet. Thank you for the blog.
Ross (s/n 159)
That is the goal! ;)
DeleteOMG, what did you do to yourself!!! ;-)
ReplyDeleteJohn, you are my hero!
I'm dreaming for years of a Libelle, preferably in the 17-m-variant with extra trailing edge brakes… But what you achieved is so outstanding - megatons of love for the poor bird.
DeleteThe wing spars will not support the stress from a 17m wingspan. The early 201 wings with the top and bottom brakes are AWESOME!. they are better than the 301 and the later 201 wings based on the report from a friend of mine that flew Nixie! .. THNX for the comments! ;)