Welcome to a work in progress

This blog is dedicated to the restoration and modification of a Glasflügel Standard Libelle H201B, and a tribute to those who have dared to do the same, and to those who are helping with seeing this dream take flight.

Saturday, June 4, 2011

Creating a new fuselage access hatch - replacing Old Curlycue

Well, by this time, you have seen the work to replace the instrument panel, now it's time to replace that old hat self-access cover.

Just like the instrument panel, this cover was so full of holes, that it was warped and curling outward.


I used the same process as I used in making the instrument panel

The process included using a flat board that was sealed and waxed to prevent the resin from adhering to the surface.

I used Peel Ply, E-120, two layers of carbon fiber, followed by a layer of 7725 and then covered with Peel Ply.


I used the same curing process of a 24 hour pre-cure at 75 degrees, followed by a post cure of 15 hours.


I drew an outline using the old cover.


With the outline completed, I cut the excess off, and carefully sanded the material until I had a working shape.


I had a slight problem removing the glass sheet from the form, and thus there is a blemish that can be seen as a light blotch near the bottom of the hatch. Since this is the painted side, There is no problem with the blemish being there.
I used a Dremel with a grinding head to cut the notches and latch lever guide hole. I etched a circle for the cockpit vent, but I had not decided on cutting it out just yet.


The test fit on the fuselage.


Here is a photo of the old cover with the replacement.

I have the new piano hinge too, but we will need to test to see if the rivets will hold in the carbon fiber cover.


So much more to do...

Tuesday, May 31, 2011

Creating a new Instrument Panel - Part 1


As you might recall, the instrument panel face and tray......


And they were so riddled with holes, they looked like Swiss Cheese.


And no, this tray is not made of carbon fiber, it's black paint!

There was so much over-spray, it also covered the original radio case


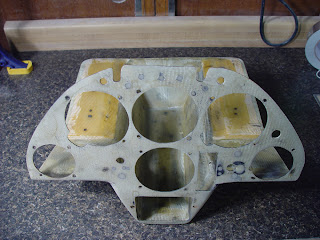
I removed the old flat black paint from the panel, only to reveal more holes.

This new development could change my original plans of just filling in the old instrument openings and screw holes.


After showing Robert the condition of the panel, he stated that it would be better if we just totally replace the face.


Before any of the work got started, Robert suggested that I find the level line on the panel so we have an alignment reference for the instruments when we are ready to mount them.


Here is a close-up of the holes on just one side.


I had just finished sealing up the holes that were in the top guides. Next, patch the holes in the tray sides and back.


Now came the task of making the flat plate mold for the front panel.

I used old counter top material that was not scratched up or porous.
I needed to create the angle on the bottom of the panel, so it would fit the tray.

I added weight to the panel to hold the tray, while I positioned the the plate to hold the correct angle.
I used hot glue to tack the wooden plated at the correct angle, then applied glue to create a better bond.

When the glue dried, I inspected the plate surface for imperfections, and used 1000 grit wet-dry paper to prep the surface for the release agent.


In order to prevent the angle of the mold from changing the shape from filling and sanding, I just used a wax mold release agent as a filler. I applied this liberally in the groove and on the surface.

 I then rubbed the wax into the surface. I applied three coats.


 I rubbed the wax into the surface between coats, until I could no longer see any surface blemishes.


To create the panel front, I used a sandwich of Peel Ply nylon first, followed by a single layer of E-120 glass, then four layers of 7725 glass, then another layer of E-120 and then covered with the Peel Ply.


To ensure that there were no bubbles in the resin and fiberglass between each layer, I squeegeed the excess resin out.


The MGS resin with the 287 hardener requires a pre-cure time of 24 hours at a temperature of 75 degrees F. And a post-cure time of 15 hours at a temperature of 120 F.

After the resin was fully cured, I placed the panel and tray back on the form with the fiberglass still attached to the mold board.

I used the lead weights from the ballast bags that were once mounted in the nose of my glider. I knew I would find another use for them.

With the panel weighted and secured, the next step was to create a means to position the panel tray with the angled surface once the old panel was removed.

Again, using hot glue, I attached wooden blocks glued to the fiberglass.

Then last, I drew a pencil outline of the panel face on the Peel Ply surface.


I drew another pencil outline of the area on the fiberglass I needed to expose to cement the tray in place. I then carefully cut the Peel Ply nylon away from the surface finish of the new panel.


Here is the point of no return! I had to carefully cut the old panel away from the tray, while leaving the slight curve along the edge.

Talk about feeling uncomfortable about doing this and praying that you don't screw it up!


After the old panel was removed, I needed to do some clean up along the front edge of the tray.


After a few test fittings, I knew I was ready to cement the tray to the new panel fiberglass.


I used two layers of the 7725 fiberglass cut in even strips. I applied the glass wet, and place a layer of the Peel Ply nylon over the strips before I squeegeed out the excess resin.
After the resin cured, I cut away the excess fiberglass leaving about an inch over the outline edge of the drawn patten from the original panel.


I then removed the wooded blocks.


Before doing the final clean up shaping cuts, I applied a light coat of resin along the inside edge to ensure that the bond was strong.
After the resin was cured, I cut away the excess resin and cleaned up the edges


The panel was ready for the first fitting in the cockpit.


I kept the parts from the original panel to verify the correct size and shape of the screw holes and latch guide notches.

I also verified the level line for the instruments.


With the new holes drilled out, I could see that the panel was properly aligned.


And to confirm it, The screws were put in!


And here is the near-finished product.


Stay tuned for - Creating a new Instrument Panel Part 2


The gear doors, not worth repairing?

This was a no brainer after I found out that replacement doors are available from Streifeneder.

So here is the full story:

After I started cleaning the old gear doors. and started removing the gelcoat,

The extent of the damage and the horrid repair work became apparent that the re-repair on them would be another nightmare.


I started to remove the old fiberglass and polyester resin from the door. It was flaking off, and splitting down the center of the skin.


The more gelcoat and Bondo I removed, the task to repair them was looking grim.


 I could not believe how much Bondo and micro bubble filler was troweled in! ..  


Oh yeah, Microbubble was the staple filler used on this glider---and measured in pounds!


So, when I found out about the availability of the replacement gear doors, the answer was YES, to the question of purchasing them verses repairing the old ones!


So, I bought them. And they are a piece of art!


Here are the new doors, which are sold in one piece and with the bungees and hinges! (next to my old ones)


Now, you are going to love this!


I weighed the doors.
The original ones photographed here, with a load of filler and gelcoat already removed, weighs in at 518g.


The new doors, without the excess glass removed and fitted, weigh in at 416g.


Like I stated earlier.... it's a no brainer!.


If you need them, the price to buy new ones offset the cost of time and material to repair badly damaged ones.

Monday, May 30, 2011

Sand and sand, and not a beach in sight! Part 3 - The days of sanding, continue!

Finally, warm dry weather, but in New Mexico, with Spring, comes the WIND!

And boy, it has been windy over the month of March and April.


I pulled out the left wing to be the one that I would sand first, since in light of the push rod incident, this wing was already out of the trailer.


I needed to use bungees to strap the wing down.


My plan, and goal was to finish sanding down the wings by the end of May.....


With the good weather being quite flaky this spring, I have been able to finish sanding the left wing before the end of May, but way short of my goal.


Sanding the gelcoat off of the top surface took longer than the work I did on the bottom.


The sanding bottom surface was completed in about two weekends.


I also uncovered the air brake drive access cover on the top of the wing.

I noticed that this insert cover on the right wing will need to be re-glued. It looks like it will not take much to pop the cover off.


Closeup of the air brake drive mechanism


 The next chore was to remove the gelcoat from inside of the wing root. The area between the spars would prove to be difficult.


The spar butts and the areas where the spars meet with the wing cord end are areas that needed to be inspected per an AD.
So, the gelcoat had to be removed for the inspections.

There was a little corrosion on the metal around the spar lift pins.

Robert will inspect these areas and we will administer the repairs if needed.

I tried to save the Werk number label, but I'm sure it will be painted over.


 I cleaned out the lift pin sockets since they were filled with old grease.


I then vacuumed out the insides of the wing.

There was a lot of old resin debris, insects and dust rattling around in there.

To quote Robert.
"I'm sure just the act of vacuuming out the inside of the wing alone removed a lot of dead weight."

One wing down.